Tuesday, October 1, 2013

Reviving this blog

So, in the years that I have left this blog things have changed and now is the place to keep track of our hectic life. In an attempt to learn better methods of running our house I have turned to Pinterest. Yeah, I know this is just sucking up more of my time, but it is helping. I have used several things on there, but I really want to keep track of the things that work in our life and what doesn't.

So here is to new beginnings!

Tuesday, March 2, 2010

Scrumptious Soft Whole Wheat Bread


Really, scrumptious is the only word I can possibly come up with for this bread. I made the Soft Whole Wheat Sandwich Bread from the HBin5 Book and it was incredibly soft, nicely sweet, and just plain yummy. I made the bread on a Saturday and ended up having to make two loaves because the first was gone within no time, and we just had to have some with dinner.

My husband did point out that he was unsure he would use this bread for sandwiches as it is so soft (yes, seriously, soft wheat bread) and he didn't know if the bread would hold up to what he would want on a sandwich. I tended to agree with him, some. Although a PB&J would probably go well with the bread since there is not much weight to it, but there would probably be some crumbs in your peanut butter as you swipe your knife across the bread.


You can see the beautifully browned crust and honey colored crumb. This is truly a favorite bread that will be made repeatedly (in between the other breads I'm doing). The lovely thing is that this book has the recipe to make this dough into hot dog and hamburger buns. I did not make those this time, but as summer gets here and we start using the grill I plan to make those buns and post them here, along with whatever screw-up I happen to make along the way!

Monday, March 1, 2010

Another use for the Chocolate Espresso Bread

The next step in this cooking adventure, was to take the Chocolate Espresso Bread Dough that I made (that turned out too bitter to eat) and convert it into Chocolate Tangerine Bars. It was my hope to fix the lack of sweetness by adding more milk chocolate chips (the recipe called for more bitter sweet) and hoping that the tangerine helped tone down the bitterness. Of course, as is my fashion to do these things, I discovered that the recipe called for dried cranberries, which I did not have. So I embarked, cranberry-less on with the bars.

I took the rather wet dough (this dough is wetter and stickier than most of the bread recipes in the book) and worked in the chocolate chips and tangerine zest. Again, it looked and smelled pretty good, and my hopes were high again. So I cooked the bars and set them out to cool. After cutting them into the bar shapes my family hesitantly took a bar each and ate.


The result of the bar was mixed. It was definitely better with the sweeter milk chocolate chips and tangerine zest, but there was still an underlying bitterness to the bar that couldn't be masked. This bar has great potential, since the fact that it is not a sweet bread makes this bar have a nice amount of sweetness without feeling like you are eating a dessert. With the correct type of chocolate in the dough originally, this could very well become a nice Saturday afternoon treat that I would feel comfortable letting my family have, in lieu of some sweet treat that will hype up the kids for a while. Despite all this, my young son ate a couple of bars, despite everyone else having one, and was even caught trying to sneak one off the counter a couple of hours later. So it was definitely not a total loss as quite a bit was eaten, but I should divulge that my son is a huge bread addict (like his parents) and is not very picky when it comes to his bread.

Thursday, February 25, 2010

Explaining the Bread in 5 Minutes a Day Method

I'm going to take a quick break in here to explain more fully the method that is behind the "Artisan Bread in Five Minutes a Day" and "Healthy Breads in Five Minutes a Day". I know that some may be wandering how making bread at home could possibly go hand-in-hand with the lazy mom way. So I'll try to sum it up here.

The method behind these books is that you spend a few minutes mixing up a batch of dough that can make about 3-4 loaves. This dough is a no-knead dough, meaning that it is mixed up well and then just set aside to rise. After the initial 2 hour rise, you can then just move the dough to the fridge for later use. In fact, the dough tends to develop some wonderful sour dough notes the longer it is left in the fridge, so it is suggested in the book (and by me) that if you can let it sit overnight before using it, you will get better flavor. However, it still tastes fantastic if you can't do that (which we frequently can't because... well we love bread).

The dough for the breads tends to be wetter than most other bread doughs, and can be a little off putting for those that are already adept at bread baking. Once you get used to this, though, bread baking is made simple, and trust me as someone who has tried to learn to just "pull together" a loaf of bread and figure out the science behind it (with plenty of fails) I'm glad I have a simple method that works so well.

Once you are ready to use your dough, you pull out what you need from the refrigerator, make a dough ball, and set it on the counter to rest, meanwhile you heat up the oven with your stone in it. Once an appropriate amount of time has passed you slit the top of the dough and slide it on top of your baking stone, pour some water in a roasting pan (this makes the crispy, chewy crust) and bake for the amount of time your particular dough and shape require.

See, pretty simple. You spent maybe 15 minutes (and that's with an almost 5 year old helping) mixing everything together so that you can have 3-4 loaves over the next week and an additional minute or two shaping out your dough before letting it rest and bake. Yes, there is a lot of "sitting on the counter" time, but that doesn't really require much attention on your part. Now, this is a general overview of bread baking with this method, and there are many variations depending on dough type and shape. Also, there are some great ways to utilize many of the dough recipes for other kinds of treats (like doughnuts). So join along if you will and post on your trials and successes, or just watch me as I make delicious breads and occasionally fumble around the kitchen a little.

Wednesday, February 24, 2010

More woes in the kitchen

So I set out to make another bread, keeping in mind that the Whole Wheat flour I had used previously was not an appropriate whole wheat for bread (too course a texture). So a trip to the local co-op provided me with the needed Whole Wheat Bread Flour to make my next batch of bread. I get home with what I thought was all I needed to make the Chocolate Espresso Bread for Valentine's weekend. Sounds divine, doesn't it? Well, turns out, not so much.

Upon starting my venture into this new bread, I find that I did not have the bitter sweet chocolate required. However, I did have unsweetened chocolate and milk chocolate chips. Mixing these would have to produce the right amount of sweet... right? Turns out, that is wrong. I mixed the bread and it came out the rather wet consistency that the book warned, which was strange, but on track. I refrigerated the dough to make it workable, again as per the instructions. The dough was a beautiful dark chocolate color and I was excited for my newest experiment to be completed, and so was my daughter who had helped me make the dough.

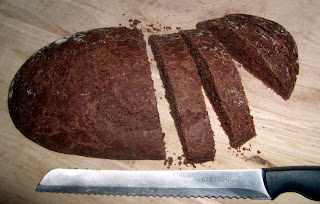
Together we worked the cool dough into a ball and placed it to rest on the pizza paddle that we use to transfer the bread to and from the oven, we preheated the oven, and waited patiently as time rolled by and we were able to put the now formed ball of dough into the oven. With excitement we waited for the dough to cook, but the smell seemed a little "off". It smelled almost burnt, that scent that occurs when you know that something may have sat in the pan just a minute too long. Nothing strong or obvious, just bitter and not quite right. We pulled the cooked bread out of the oven and set it aside to cool, the entire time thinking it looked nice, but it just didn't entice us to start eating it right away.

After a good cool down time, and the man of the house coming in from work, we cut into the bread, put a pat of butter on it and made not so pleased faces while we ate. I quickly realized the error as I ate the, perfectly edible but not fantastic, bread. That unsweetened chocolate was just too bitter for this project and the milk chocolate chips did not help to sweeten the bread in the way I had hoped. Sadly, I had to concede that my second batch of bread was another fail. Granted, it was an edible fail, but a fail none the less. We even had half the loaf leftover the next day (almost unheard of in this house if I have only made a single loaf), so I threatened to force it on the family for breakfast. I did actually follow through with that threat hoping that toasting the bread and putting maple syrup over it would help, which it did... a little.

So without further ado, I'll show you the bread that I made (finally I remembered to take pictures).


As a reminder (did I mention this before, if not here it is), the HBin5 method has you make enough dough to make 3-4 loafs all at once. The dough is then refrigerated for you to take out and use as you need (preferably within 5-10 days of making). My next experiment will be using this dough again to make a bar in hopes of fixing my mistake.

Friday, May 29, 2009

Washing lettuce

Well, we've been getting loads of fabulous veggies from the local farmer's market, and among those veggies that are coming out right now is lettuce. Now if you've only been privy to lettuce that you buy in the grocery store, then you are probably unaware of the amount of dirt that can accumulate in between the leaves.

So the other week I came home with two large heads of lettuce and proceeded to prepare them to put in the fridge. To make things easier for later I decided to wash and tear the lettuce up so that all that I have to do is pull out what the family needed and use right away. To wash farm fresh lettuce it is best to soak the lettuce in water so that sand and dirt can sink to the bottom of the water, then take the lettuce from the water and use a salad spinner to get the moisture off the lettuce. Typically I do this by loading the lettuce in the spinner to do the whole process, taking the basket out with the lettuce to dump the water out of the lower bowl then replacing the basket with lettuce to spin.

The problem is, that with so much lettuce it would have taken 4-5 times to do this and that a lot of wasted water. I didn't want to fill the whole sink, not to mention I had already filled the salad spinner. While looking over my options, I happened to have a bucket that my family uses to pick strawberries with and I decided to dump the water from the sald spinner (along with the lettuce) into this bucket. I would add lettuce to the water, swishing it around every now and then until the lettuce took up about 1/2-2/3 of the water space (you want to have room at the bottom to collect the dirt). By the time I was done putting the lettuce in the water, it was ready to move it on to the salad spinner. I spun the lettuce and transferred it to a bag that would go in the refridgerator (this is a good way to reuse a ziploc bag), and then repeated the entire process.

Instead of using 4-5 buckets of water (approximately one gallon sized), I used one bucket of water to rinse 2 of the largest heads of lettuce I've ever seen. If I did this every two weeks (which is probably less often than it actually would be), I can save up to 8 gallons of water a month, and up to 24 gallons per season (since we maybe get local lettuce for 3 months, at the outside). This is a small amount of water, but all these little things add up.

If I find some other vegetable like this (say Swiss Chard, Leeks, and other really dirty veggies) and use the same concepts, finding the smallest volume that I can use and just using it repeatedly until all my veggies are clean, then I could save much more water in the process. Since most dirt and sand will just sink to the bottom, the water above the bottom 1/4 should be relatively clean (maybe a little green, but free of sediment). For particularly dirty leaves I rub a thumb over them to break up anything that's not realeasing on it's own.

Monday, April 20, 2009

The Importance of Gardening

AHHH, SPRING!!!

It's time for me and my family to get outside more and work in our garden. A garden is a fantastic way to save money on groceries (evnetually), reduce stress, teahc the kids valuable lessons, and stay green. Even more green than a garden in your back yard?? A garden in your front yard!! Grass requires a lot of water, it's tough to get much biodiversity (diversity in insects and other good creatures living in the dirt), and the chemicals required to keep a green lawn without weeds are pretty harsh to the environment (see biodiversity of grass).

The benefits of grass?? Well, it's pretty, you can walk across it without shoes, and on a hill it can prevent erosion.

The benefits of a garden instead?? You can eat what grows, it's much more colorful, more forgiving of mistakes, more motivation to working in it, and your dogs that live in the backyard can't destroy it!

Here's a picture of my garden just before planting for the spring. As you can see there are still lots of plants there that have stuck around over the winter.


Here's the same garden with a tiny bit of snow (a rarity around here).


And here is the same garden today (3 weeks post planting)


Okay, so maybe I just wanted to post pictures today, but there are some serious advantages to having a garden out front, as mentioned before.

One advantage is that gardens are more forgiving than lawns. If you plant multiple fruits and vegetables in your garden, your bound to get something out of it. If your soil is missing something you may have a problem growing some things but others may thrive. If your soil is missing something that the lawn needs it will all look bad. If you have a dead patch in the garden, just pull up the plants, add some compost and plant something else. If you have a dead patch in your lawn your going to have a harder time digging it up and replacing and it will be awhile before it blends in to the rest of the grass.

Another advantage is that it's easier to go organic with a garden than with a lawn (see more forgiving). While it is possible to go organic with a lawn, it is less forgiving and if you don't get your fertilizer ratios right (ie you'll most likely need store bought ) then it won't be the image of perfection that most want and the use of herbicides to get rid of weeds are generally used by most.

Let's face it, I'm lazy! I LOVE gardening, but if I don't see my gardening daily (even multiple times a day) then I just won't take care of it. It just won't be at the forefront of my mind, and I suspect it's the reason so many others fail at their back yard gardens, as well. I need to see the weeds as they pop up to pull it or they'll grow out of control. I need to see the ripe plump tomatoes and other veggies to realize that I need to pick them or they'll wither and rot on the plant. But most of all, I just need the reminder to go out and enjoy the garden and my children playing in it.

The last advantage that I'd like to discuss is the wonderful circle of life it creates. When you grow a garden you appreciate your fruits and vegetables more (even the ones you buy), in turn you are more likely to eat them helping to create a more healthy habit. After eating your produce you typically need to do something with the waste left behind and a common sense move is to start a compost (free fertilizer, who doesn't love that?) and that in turn will give you a bigger healthier garden.